混了这么久,一直想拥有自己的博客,通过jekyll和GitHub Pages捣腾出了自己的博客(https://www.ichochy.com)
一、安装jekyll
-
首先有安装
Ruby的开发环境 -
运行
gem install jekyll bundler安装jekyll和bundler -
运行
jekyll new myBlog创建默认的blog
文件目录:
-rw-r--r--   1 mleo  staff    35  2 13 15:02 .gitignore
-rw-r--r--   1 mleo  staff   398  2 13 15:02 404.html
-rw-r--r--   1 mleo  staff  1039  2 13 15:02 Gemfile
-rw-r--r--   1 mleo  staff  1686  2 13 15:03 Gemfile.lock
-rw-r--r--   1 mleo  staff  1652  2 13 15:02 _config.yml
drwxr-xr-x   3 mleo  staff    96  2 13 15:02 _posts
-rw-r--r--   1 mleo  staff   539  2 13 15:02 about.md
-rw-r--r--   1 mleo  staff   175  2 13 15:02 index.md
- 运行
cd myBlog进入blog目录,运行bundler exec jelly serve启动
MacBook-Pro:myBlog mleo$ bundler exec jekyll serve
Configuration file: /Users/mleo/Develop/Coding/myBlog/_config.yml
            Source: /Users/mleo/Develop/Coding/myBlog
       Destination: /Users/mleo/Develop/Coding/myBlog/_site
 Incremental build: disabled. Enable with --incremental
      Generating...
       Jekyll Feed: Generating feed for posts
                    done in 0.862 seconds.
 Auto-regeneration: enabled for '/Users/mleo/Develop/Coding/myBlog'
    Server address: http://127.0.0.1:4000/
  Server running... press ctrl-c to stop.
- 通过
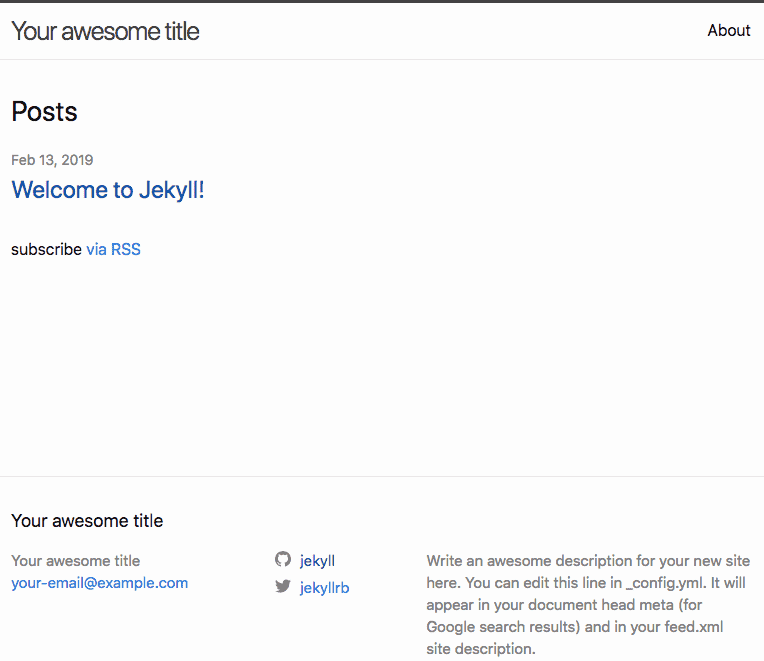
http://127.0.0.1:400就可以访问blog了
如下图:
二、了解jekyll
-
jekyll目录结构:
文件/目录 描述 _config.yml常量配置信息,网站的基础信息 _drafts未发布的草稿帖子 _includes模块化页面,使用: include default.html_layouts布局模板页面,使用: layout: default_posts发布的blog,固定格式: YEAR-MONTH-DAY-title.MARKUP。_data文件数据( .yml、.yaml、.json、.csv或.tsv格式)_sass定义站点使用的样式 _siteJekyll build 后生成的站点静态文件 .jekyll-metadataJekyll build 日志信息 index.html或index.md其他HTML,Markdown文件将由Jekyll转换,生成首页 其他文件/文件夹 例如 css、images和favicon.ico文件等 -
通过
Gemfile文件配置 jekyll 主题从Jekyll 3.2开始,
jekyll new使用Gemfile文件来定义网站的主题,使默认目录结构更简单。默认情况下_layouts,_includes和_sass存储在Ruby中。minima 是默认主题,运行
bundle show minima显示主题文件位置
MacBook-Pro:myBlog mleo$ bundle show minima
/Library/Ruby/Gems/2.3.0/gems/minima-2.5.0
-
自定义站点信息
通过自定义
_config.yml文件,改变 blog 网站信息,常量 说明 title 标题 email 作者邮箱 description 网站信息 baseurl 网站路径 url 网站地址,如:https://www.ichochy.com twitter_username 媒体账号,如:iChochy github_username 媒体账号,如:iChochy 注:修改
_config.yml需要重启服务
三、书写Blog
-
进入
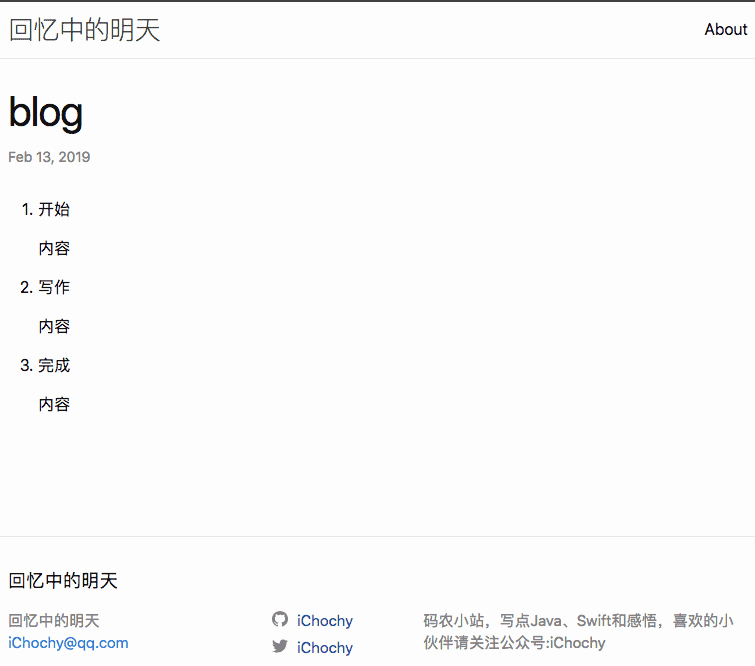
_post目录,开始你的创作吧,注意文件的格式必须为YEAR-MONTH-DAY-title.MARKUP,如:2019-02-13-blog.md。 -
开始写作吧,直接使用
md语法来书写你的文章
---
                       --指定模板
title:  "blog"                     --标题
date:   2019-02-13 15:02:11 +0800  --时间
tags: blog                   --分类

---
                                   --内容
1. 开始

   内空
2. 写作

   内容
3. 完成

   内容
如下图:
四、创建GitHub Pages项目
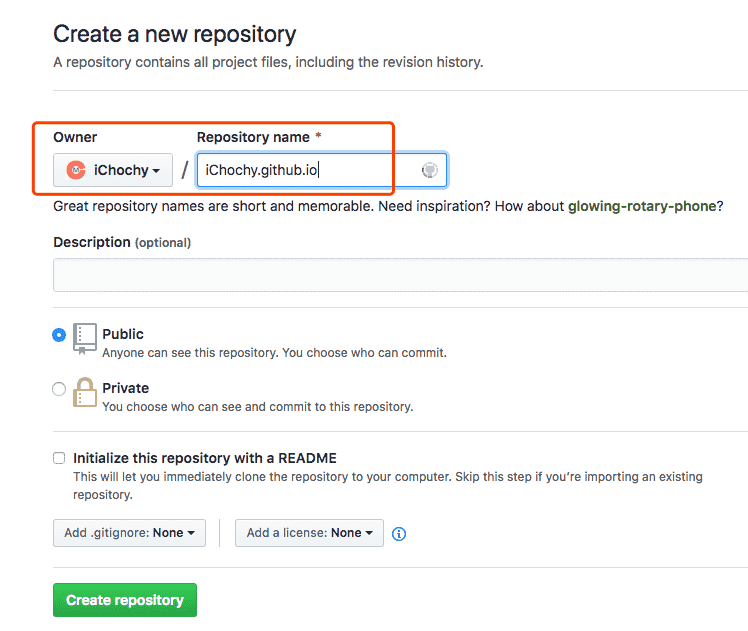
- 新建一个项目,项目名必须为
<username>.github.io,如:我的用户名为iChochy,项目名为iChochy.github.io
如下图:
五、将Blog接交到GitHub
- 将本地写好的的
blogpull到github上,在项目设置中打开GitHub Pages
如下图:
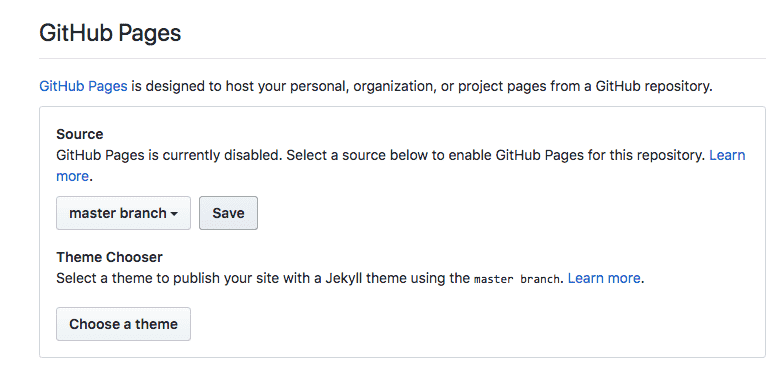
- 选择
master branch并保存,就完成了部署
六、运行Blog
直接访问项目名(<username>.github.io)就可以看你blog了,如:iChochy.github.io
七、自定义域名
-
自定义域名需要有自己的域名,没有可以注册购买个心意的域名:阿里云
-
进入域名配置中心,配置域名解析 如下图:
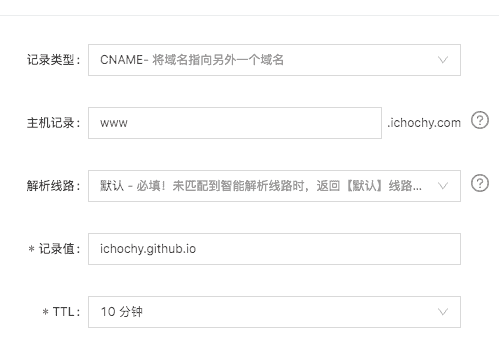
- 进入
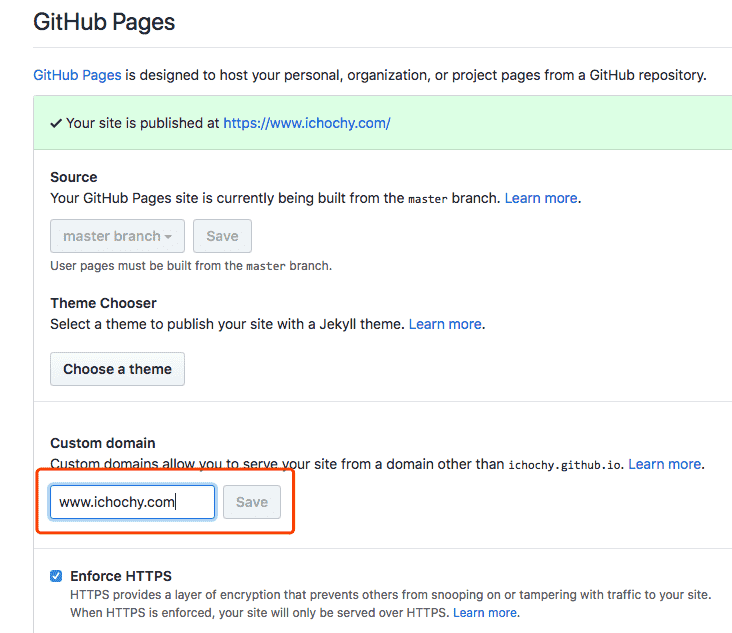
github项目设置,设置自己的域名并保存,就完成了自定义域名设置 如下图:
八、开启HTTPS
-
进入
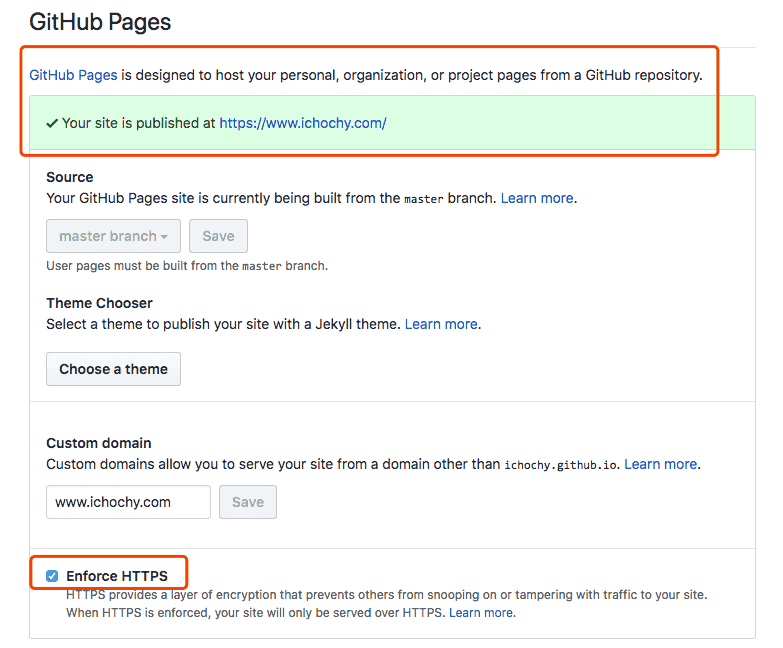
github项目设置,开启Enforce HTTPS就完成了不过,如果是自定义域名,会需要等待几分钟,
github需要申请证书并部署 -
完成开启后,如下图:
上一篇:加速你的博客永无止境-七牛云CDN
下一篇:通过shell查看SVN的版本信息